Backing up your iPhone is one of the most essential practices for securing your data. Whether it’s photos, contacts, messages, or app data, having a reliable backup can save you in case your phone is lost, damaged, or reset. In 2025, Apple continues to offer two primary ways to back up your iPhone: iCloud and iTunes (or Finder on macOS Catalina and later). In this comprehensive 2000-word guide, we’ll walk you through everything you need to know about backing up your iPhone safely using both methods.
1. Why Backing Up Your iPhone Matters
Our smartphones are digital containers for our lives. Photos, work files, financial apps, and important communications all live on them. Losing your iPhone without a backup could mean:
-
Losing irreplaceable memories and documents
-
Facing hours of reconfiguration and redownloading apps
-
Data loss from hardware failure or software bugs
A proper backup ensures peace of mind, allowing you to restore your device quickly in any scenario—whether it’s a lost phone, a new purchase, or a factory reset.
2. iCloud vs. iTunes: Key Differences
| Feature | iCloud Backup | iTunes/Finder Backup |
|---|---|---|
| Storage Location | Cloud (Apple servers) | Local (your computer) |
| Backup Type | Incremental (uploads changes) | Full backup (entire data copied) |
| Encrypted? | Yes (automatically encrypted) | Optional (manual toggle in iTunes/Finder) |
| Storage Limit | Limited by iCloud plan (5GB free) | Limited by your computer’s hard drive |
| Ease of Use | Easy, automatic, wireless | Manual, requires connection via cable |
| Best For | Convenience and wireless use | Full backups and more control |
Recommendation: Use both when possible. iCloud offers automatic protection, while iTunes gives you a more complete and manual backup solution.
3. How to Prepare Your iPhone for Backup
Before you start backing up your iPhone, take the following steps to ensure the process goes smoothly:
✅ Charge Your iPhone
Backups can take time, especially the first one. Ensure your iPhone is at least 50% charged or connected to power.
✅ Connect to Wi-Fi (For iCloud)
iCloud backups require a stable Wi-Fi connection.
✅ Update iOS
Go to Settings > General > Software Update to make sure you have the latest version of iOS, which can improve backup performance and security.
✅ Clean Up Unnecessary Data
Remove unused apps and media to save storage space on iCloud or your computer.
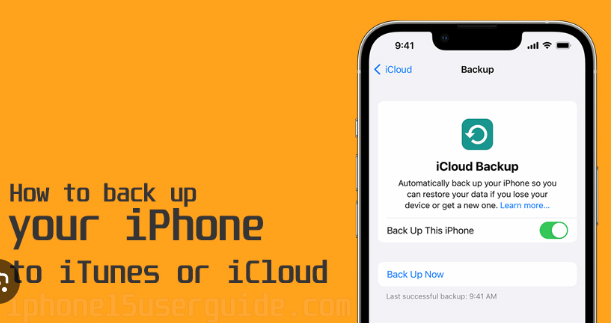
4. Step-by-Step Guide to Backing Up with iCloud
iCloud allows you to back up your iPhone wirelessly and automatically. Here’s how to do it:
Step 1: Connect to Wi-Fi
Go to Settings > Wi-Fi and ensure you’re connected to a stable network.
Step 2: Enable iCloud Backup
-
Open Settings.
-
Tap your Apple ID name at the top.
-
Select iCloud > iCloud Backup.
-
Toggle on Back Up This iPhone.
Step 3: Initiate Manual Backup
Tap Back Up Now. Stay connected to Wi-Fi until the process finishes.
Step 4: Verify the Backup
After completion, check the time of the last backup under iCloud Backup settings.
What iCloud Backs Up
-
App data
-
iMessages, SMS, MMS
-
Photos and videos (if not using iCloud Photos)
-
Settings and device configurations
-
Home screen and app organization
-
Health data
-
Call history
5. Managing iCloud Storage and Backup Settings
By default, Apple gives 5GB of free iCloud storage, which is often not enough for full device backups.
Check Your iCloud Storage
-
Go to Settings > Apple ID > iCloud > Manage Storage.
Upgrade iCloud+ Plan
If you need more space:
-
Tap Upgrade to iCloud+.
-
Choose a plan:
-
50GB
-
200GB
-
2TB (for families or power users)
-
Optimize Backup Settings
-
Turn off backup for apps that you don’t need backed up under iCloud > Manage Account Storage > Backups > [Your Device].
6. Step-by-Step Guide to Backing Up with iTunes (or Finder)
iTunes (on Windows and macOS Mojave or earlier) and Finder (on macOS Catalina and later) provide a manual backup method with more control.
Step 1: Connect Your iPhone
Use a USB/Lightning cable to connect your iPhone to your computer.
Step 2: Open iTunes or Finder
-
On macOS Catalina or later: Open Finder.
-
On Windows/macOS Mojave or earlier: Open iTunes.
Step 3: Locate Your Device
-
In Finder, your iPhone will appear in the sidebar.
-
In iTunes, click the iPhone icon in the top-left corner.
Step 4: Set Backup Preferences
-
Select Back up all of the data on your iPhone to this Mac/PC.
-
(Optional): Check Encrypt local backup for password-protected, more secure backups.
Step 5: Start the Backup
Click Back Up Now. Wait for the process to complete.
Step 6: Confirm the Backup
Under the “Latest Backups” section, you’ll see the time and date of the most recent backup.
7. Restoring from a Backup: iCloud vs. iTunes
There may come a time when you need to restore your iPhone—after getting a new phone or doing a factory reset.
Restore Using iCloud
-
During setup of a new or reset iPhone, select Restore from iCloud Backup.
-
Sign in with your Apple ID.
-
Choose the most relevant backup.
Restore Using iTunes/Finder
-
Connect your iPhone to your computer.
-
Open iTunes/Finder.
-
Select Restore Backup.
-
Choose the desired backup file.
-
Click Restore and wait for the process to complete.
💡 Encrypted backups restore Wi-Fi passwords, health data, and app settings—non-encrypted ones won’t.
8. Tips for Secure and Automatic Backups
To maintain safe, consistent backups, follow these best practices:
✅ Enable Automatic iCloud Backups
Keep iCloud Backup turned on so your iPhone backs up daily when:
-
It’s connected to Wi-Fi
-
It’s charging
-
The screen is locked
✅ Use Strong Apple ID Password
Your iCloud backup is only as secure as your Apple ID. Use two-factor authentication (2FA) and a strong password.
✅ Keep Your Mac/PC Secure
If using iTunes, make sure your computer is protected with antivirus software and disk encryption.
✅ Regularly Test Backups
Restore to a spare device occasionally or check backup size/date to confirm functionality.
9. Common Backup Issues and How to Fix Them
❌ iCloud Storage Full
Fix: Upgrade storage, delete old backups, or remove unnecessary iCloud content.
❌ Backup Failed or Stuck
Fix:
-
Restart your iPhone.
-
Check Wi-Fi connection.
-
Sign out and back into iCloud.
❌ iTunes Doesn’t Recognize iPhone
Fix:
-
Use a different USB cable or port.
-
Trust the computer on the iPhone.
-
Update iTunes or macOS.
❌ Backup Takes Too Long
Fix:
-
Delete large media files temporarily.
-
Ensure fast Wi-Fi or USB 3.0 connection.
10. Final Thoughts
Whether you choose the convenience of iCloud or the full control of iTunes/Finder, regular backups are crucial to protecting your digital life. In 2025, Apple has continued refining its backup tools to make them more secure, flexible, and user-friendly.
If you prefer automation and wireless access, iCloud Backup is your best bet. If you need full offline access and control, iTunes/Finder Backup gives you the most detailed snapshot of your iPhone. Use both for a layered and fail-safe strategy.
By following this guide, you’ll be fully equipped to back up and restore your iPhone with confidence—no matter what happens.